1 Annotation checklist
This guide is meant to be a checklist for annotating categories of embryonic development in Montipora capitata using NIS-Elements BR.
For a basic introduction to using NIS Elements Annotation & Measurement tool, check out this elearning video.
Open NIS-Elements BR
File>Open…
Select sample folder
Open
*stitch*.nd2Show scale> Burn scale…
- Select
Noin response to pop-up asking to convert to RGB
- Select
Select
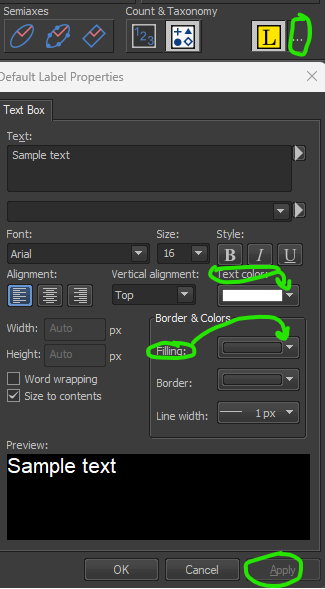
Appending Labelsand click ont he three dots to change font color to white and background to transparent. Keep all other settings the same.
Using the annotation & measurement tool, insert text to label via numbering 1-n each embryo at its upper left quadrant. Do not number debris.
Click on the taxonomy shape icon under
Count & TaxonomyRight click inside the table to access
Taxonomy OptionsSet number of classes to 10
egg
cleavage
4 to 16 cell
32 to 64 cell
prawn chip
early gastrula
debris
malformed
typical
torn

Click on taxonomy label and label each embryo with a selection from phase (egg, cleavage, 4-16, 32-64, prawn chip, or early gastrula) and proper selection from status (debris, malformed, typical, torn)
File > Save
- This saves the annotation layer to the .nd2 file
File > Save As … > JPEG - JIFF Format (*.jpg; *.jpeg)
Filename
_scalereplaces_00
Close jpg, make sure you’re working on the nd2 file with annotations showing
Save again as JPG with
Burn Annotationschecked, andannoto replacescaleReopen .nd2 file with annotations showing
Fill out Google sheet for each stitched sample slide
2 Egg
2.0.0.1 exemplar
2.0.0.2 fragmented
2.0.0.3 deformed
3 Cleavage
3.0.0.1 exemplar
3.0.0.2 fragmented
3.0.0.3 deformed
4 4-16 cell
4.0.0.1 exemplar
4.0.0.2 fragmented
4.0.0.3 deformed
5 32-64 cell
5.0.0.1 exemplar
5.0.0.2 fragmented
5.0.0.3 deformed
6 Prawn chip
 #### exemplar
6.0.0.1 fragmented
6.0.0.2 deformed
7 Early gastrula
 #### exemplar